
MLFlow is a powerful open source MLOps platform with built in framework for serving your trained ML models as REST APIs. The REST framework will load data provided in a JSON or CSV format compatible with pandas and pass this directly into your model. This can be handy when your model is expecting a tabular list of numerical and categorical features. However it is less clear how to serve with models and pipelines that are expecting unstructured text data as their primary input. In this post we will explore how to train and then serve an NLP model using MLFlow, scikit-learn and spacy.
What you’ll need and Installing dependencies
In order to use MLFlow and to train our NLP model you’re going to need Python 3.6+. I’m a big fan of using miniconda to manage Python dependencies and MLFlow uses conda to manage ML server environments. Therefore, it’s the logical choice for managing our project and for the remainder of this post I will provide instructions for this. If you’re handy with pip or pip-based dependency managers like Poetry or pipenv then you should find its easy enough to follow along but YMMV (especially when it comes to the environments MLFlow generates).
First I’m going to create a new conda environment with the requirements we need installed already:
conda create -n mlflow-nlp-model -c conda-forge python==3.7 pandas scikit-learn mlflow spacy pip notebook
This may take a couple of minutes to resolve but you should be able to accept (type ‘y’ when prompted) and wait for conda to download and install the requirements.
Now we can activate our environment by running conda activate mlflow-nlp-model
Collecting and preparing our data
We are going to train a model to classify email messages from the 20 newsgroups dataset provided as part of Scikit learn. Of course the techniques we use here could be applied to other real world datasets too.
Firstly (assuming you have a jupyter notebook or Python prompt ready), we’re going to download the data and turn it into a Pandas dataframe:
from sklearn.datasets import fetch_20newsgroups
import pandas as pd

def df_from_20ng(subset):
    newsgroups_train  = fetch_20newsgroups(subset='train')
    ngdata = {"text": newsgroups_train.data, "target": newsgroups_train.target}
    df = pd.DataFrame.from_dict(ngdata)
    df['target_name'] = df.target.apply(lambda x: newsgroups_train.target_names[x])

    return df


df_train = df_from_20ng('train')
df_test = df_from_20ng('test')

X_train = df_train.drop(columns=['target','target_name'])
y_train = df_train['target_name']
X_test = df_test.drop(columns=['target','target_name'])
y_test = df_test['target_name']
The above code will automatically fetch the example dataset from scikit learn’s servers (or use a local cache after the first time you run it). We iterate over the data and load it as a Pandas dataframe.
The data is already conveniently partitioned into test and train sets but if you are using your own data you could generate a single dataframe and then use train_test_split() to partition it - this function works fine on dataframes.
We end up with X_train and X_test which are pandas data frames containing just the text from each email and data frames y_train and y_test which contain the corresponding ground truth classifier labels for the emails.
You might have noticed that our X_train and X_test dataframes only contain one column and you might wonder why we bother using a dataframe here when a 1 dimensional array or list would suffice. Well, the reason is that using a dataframe makes it possible for us to simply pass in CSV and JSON data to the REST API - hopefully it will become a bit clearer below.
Defining our ML pipeline
The next step is to define our feature transformer and model pipeline. We’re going to use Scikit-learn’s Pipeline construct which allows us to easily define the components that we want to chain together.
For our first experiment we are going to keep things simple by using a TF-IDF Vectorizer which models each word (up to a vocabulary limit) as a separate sparse feature and takes into account the ratio of each word’s term frequency (how many times it appears in a document) divided by word document frequency (how many documents each word appears in). You can read more about TF-IDF in the scikit-learn documentation. TF-IDF is older and simpler than current state of the art feature extraction methods but it can often work well as a lightweight baseline for text representation. We’ll look at more complicated techniques in our next experiment.
We’re also going to use a RandomForestClassifier for our classification model. Again, RF models serve as a relatively low-compute-intensity baseline and a starting point for our modelling.
The final component that you may not recognise is the ColumnTransformer. This provides a user friendly way for scikit-learn to interact with pandas dataframes and it offers some very powerful matching for larger data frames. In this case we are just using it to extract the text column from the emails which is then passed to our TFIDF Vectorizer for feature extraction and finally to the classifier for training or prediction.
The code looks like this:
from sklearn.compose import ColumnTransformer
from sklearn.feature_extraction.text import TfidfVectorizer
from sklearn.pipeline import Pipeline
from sklearn.ensemble import RandomForestClassifier

ct = ColumnTransformer([
    ('tfidf', TfidfVectorizer(max_features=5000), 'text')
])

pipe = Pipeline([
    ('ctransformer', ct),
    ('clf', RandomForestClassifier(n_estimators=10, max_depth=20))
])
Next we can train our model and log it and our initial evaluation metrics to MLFLow:
import mlflow
import mlflow.sklearn
import json
import os
import tempfile

from sklearn.metrics import f1_score, classification_report, plot_confusion_matrix
from mlflow.models.signature import infer_signature

mlflow.set_experiment("My NLP Model")


with mlflow.start_run(run_name="TFIDF + Random Forest"):

    pipe.fit(X_train,y_train)

    y_pred = pipe.predict(X_test)

    mlflow.set_tag('client','That Email Company')

    signature = infer_signature(X_test, y_test)

    mlflow.log_metric('f1', f1_score(y_test, y_pred, average='micro'))
    mlflow.sklearn.log_model(pipe, "model", signature=signature)

    with tempfile.TemporaryDirectory() as tmpdir:

        report = classification_report(y_test, y_pred, output_dict=True)

        with open(os.path.join(tmpdir, "classification_report.json"),'w') as f:
            json.dump(report, f, indent=2)

        mlflow.log_artifacts(tmpdir, "reporting")
We train the model with pipe.fit() and then get predictions on the test set with pipe.predict(X_test). This allows us to generate our classification report detailing Precision and Recall per class by comparing y_pred and y_test - the predicted and actual labels for our test set respectively. We also report the overall micro-averaged F1 score for the model to give a high level indication of how it is performing.
The infer_signature() function is quite important here. This is where we tell MLFlow what the inputs and outputs for this model look like. By passing in our X_test and y_test variables, mlflow will identify that it should expect a dataframe with a column called text.
You can verify that the signature was captured correctly by opening the run in the MlFlow server GUI (run mlflow server and navigate to http://localhost:5000) and viewing the MLmodel file. You should see something like this:
...
signature:
  inputs: '[{"name": "data", "type": "string"}]'
  outputs: '[{"type": "string"}]'
Running our model
Now we are going to run our model as a REST API and make some API calls to it. Firstly you are going to need to find the full URI to the model that we just trained. the easiest way is to open up the MLFlow server GUI (run mlflow server and navigate to http://localhost:5000), open up the run we just created and copy the path from there:
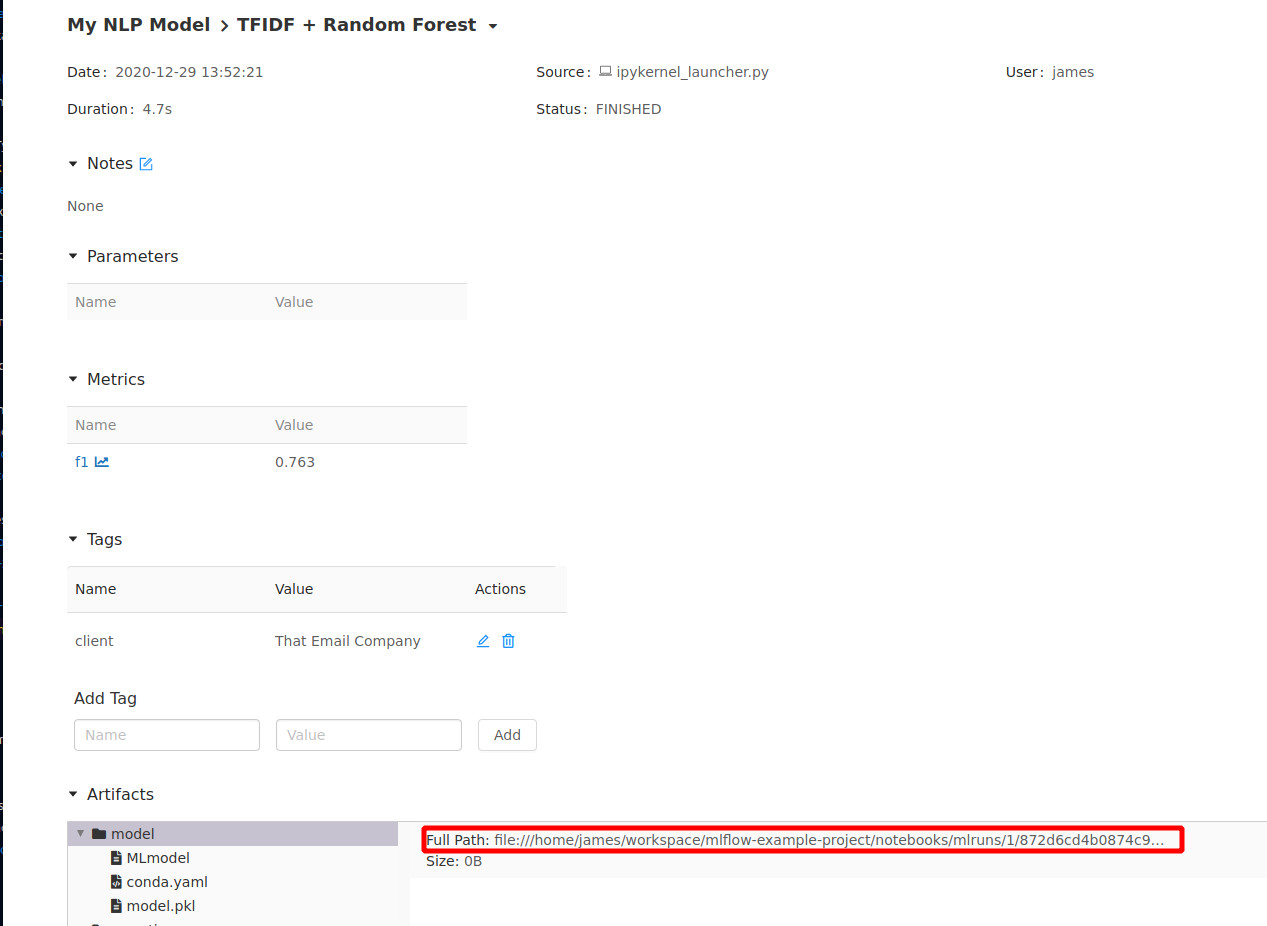
The full path to the models directory within the run is what we need - if it is shortened with elipses you may need to expand your browser window to make sure you copy all of it.
Now we can simply run the MlFlow model server script in order to test it. The first time you run this it might take a few minutes to initialize since it will try to create a new conda environment for each model (based on the run_id). However, you should find it’s pretty speedy for subsequent loads.
FYI if you are using mlflow with cloud backed storage (i.e. S3 or GCP instead of local filesystem) then this should work but you will need to set environment variables so
that the script can find the relevant security tokens etc as documented here. You can just substitute out the file:/// uri for the relevant string from your model run (i.e. gs://)
You should see some output like this:
> mlflow models serve -m file:///home/james/workspace/mlflow-example-project/notebooks/mlruns/1/872d6cd4b0874c99808c5259d9eb823b/artifacts/model                                                                                       master [0ea16fd] modified untracked
2020/12/29 14:00:28 INFO mlflow.models.cli: Selected backend for flavor 'python_function'
2020/12/29 14:00:29 INFO mlflow.pyfunc.backend: === Running command 'source /home/james/miniconda3/bin/../etc/profile.d/conda.sh && conda activate mlflow-6fd5007aa398d705b7ced4118b6b9ddf2ad4c4e4 1>&2 && gunicorn --timeout=60 -b 127.0.0.1:5000 -w 1 ${GUNICORN_CMD_ARGS} -- mlflow.pyfunc.scoring_server.wsgi:app'
[2020-12-29 14:00:29 +0000] [1063058] [INFO] Starting gunicorn 20.0.4
[2020-12-29 14:00:29 +0000] [1063058] [INFO] Listening at: http://127.0.0.1:5000 (1063058)
[2020-12-29 14:00:29 +0000] [1063058] [INFO] Using worker: sync
[2020-12-29 14:00:29 +0000] [1063064] [INFO] Booting worker with pid: 1063064
Using the model
Now we should be able to test the model. Here’s where it all comes together! Since we used the column transformer and used infer_signature when we logged our model, the server should:
- provide a basic level of input validation and provide user errors if columns the model doesn’t know about are submitted
- understand that the unstructured text input will come from a column named
textin a dataframe provided via CSV or JSON.
Without using the ColumnTransformer, the model may have behaved incorrectly or unpredictably by interpretting the first column in the input as the text input regardless of what it contained. The ColumnTransformer lets us specify an explicit contract with the REST server and the model signature provides clear instructions to the user (via validation error messages) on how to format the model input.
Using CURL, you can run the following in your shell session:
curl --request POST \
  --url http://127.0.0.1:5000/invocations \
  --header 'Content-Type: application/json; format=pandas-records' \
  --data '[
{"text":"hey, I have an old bicycle for sale in the Southampton area"}
]'
Hopefully you will see the following response
["misc.forsale"]
It looks like our model worked. Hooray! Now look what happens when we have a typo in our input data
curl --request POST \
  --url http://127.0.0.1:5000/invocations \
  --header 'Content-Type: application/json; format=pandas-records' \
  --data '[
{"txt":"hey, I have an old bicycle for sale in the Southampton area"}
]'
We get a response like so:
{
  "error_code": "BAD_REQUEST",
  "message": "Model input is missing columns ['text']. Note that there were extra columns: ['txt']"
}
As you can see we get an error because the ’text’ column is missing. We also get a hint about the fact that ’txt’ is an unexpected column. If we were to pass in multiple columns (e.g. we get ’text’ right but we also pass in ‘from’ containing the email address of the sender, the) the server would provide a response, silently discarding any columns that it does not recognise. It only warns about extra columns in the event that a required field is missing.
Conclusion
In this post we’ve built an end-to-end script that trains and stores an NLP classification model in MLFlow and we’ve also looked at serving the model using MLFlow’s built in deployment tools. There are many ways to skin a cat as the saying goes but this is one tried and tested method for getting MLFlow’s built in REST server to play ball.
I’ve provided the training script as a Github gist.
Tune in next time when we will be showing how to use SpaCy in our MLFlow NLP pipeline.
Replies & Web Activities
If you would like to comment or reply then toot me or bluesky me about this url, or send me a webmention
1 Reposts