Introduction
In the world of AI assistants, subscription services like ChatGPT Plus, Claude Pro and Google One AI have become increasingly popular amongst knowledge workers. However these subscription services may not be the most cost-effective or flexible solution for everyone and the not-insignificant fees encourage users to stick to one model that the've already paid for rather than trying out different options.
I previously wrote about how you can self-host Llama3 on a machine with an older graphics card using open source tools. In this post, I demonstrate how to expand this setup to allow you to interact with OpenAI, Anthropic, Google and others alongside your local models via a single, self-hosted UI.
Why ditch my subscription?
Hosting your own AI user interface allows for more granular cost control, potentially saving money for lighter users of commercial models (are you really getting $20/mo of usage out of ChatGPT?). It grants you greater flexibility in choosing and comparing different AI models without worrying about which subscription to spend your $20 on this month or forking out for more than one at a time. Additionally, commercial AI providers usually provide a more stable experience via their APIs since business users, the target audience of the API offerings, tend to have more leverage than consumers when it comes to service-level-agreements. API terms & conditions around data usage are normally better too (within ChatGPT, data collection is opt-out and you lose functionality when you do it) .
Self-hosting your chat interface with Open Web UI brings enhtanced privacy through a local UI, the capability to run prompts through multiple models simultaneously, and the freedom to use different models for different tasks without being locked into a single provider. You can build your own bespoke catalogue of commercial and local models (like Llama-3) and access them and their outputs all from one place. If you're already familiar with docker and docker-compose you can have something up and running in 15 minutes.
When might this not work for me?
If you are a particularly heavy user of the service that you're subscribed to and you're not keen on trying other models you may find that moving to pay-as-you-go is more expensive for you. The average length of a fiction book is something like 60-90k words. It costs about $5 to have GPT-4o read 16 books (input/prompt) and $15 to have it write 16 books worth of output. If you're spending all day every day chatting to Jippy then you might find that you end up spending more than the $20/mo on API usage.
If cost is your primary driver, you should factor in the cost of hosting your server too. If you are already running a homelab or a cheap VPS you might be able to run the web UI at "no extra charge" but if you need to spin up a new server just for hosting your web UI that's going to cut into your subscription savings.
If privacy is your primary driver, you should be aware that this approach still involves sending data to third parties. If you want to avoid that all together you'll need to go fully self hosted.
Finally, fair warning: this process is technical, and you'll need to be familiar (or willing to learn about) Docker, yaml config files and APIs.
The Setup
This setup builds on my previous post about Llama 3. Previously we used Open Web UI to provide a web app that allows you to talk to the LLM and we used Ollama to host Llama 3 locally and provide a system that Open Web UI could send requests to.
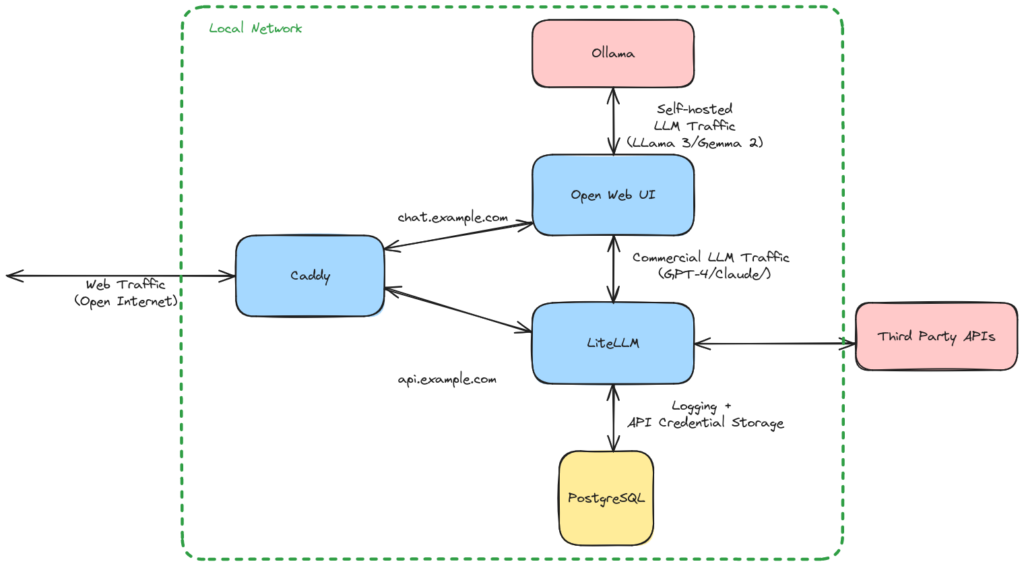
- Ollama - a system for running local language models on your computer, using your GPU or Apple silicon to provide reasonable response speeds
- Open Web UI, an open source frontend for chatting with LLMs that supports Ollama but also any old OpenAI-compatible API endpoint.
- LiteLLM Proxy which allows us to input our API keys and provides a single service that Open Web UI can call to access a whole bunch of commercial AI models
- PostgreSQL - a database server which LiteLLM will use to store data about API usage and costs.
- Caddy - used for reverse proxying HTTP traffic from the open web and routing it to Open Web UI or LiteLLM.
The resulting docker-compose file will look something like this:
version: "3.0"
services:

  ui:
    image: ghcr.io/open-webui/open-webui:main
    restart: always
    ports:
      - 8080:8080
    volumes:
      - ./open-webui:/app/backend/data
    environment:
      # after you
      # - "ENABLE_SIGNUP=false"
      # if you disable ollama then remove the following line
      - "OLLAMA_BASE_URL=http://ollama:11434"
      # if you disable ollama then set the following to false
      - "ENABLE_OLLAMA_API=true"

  db:
    image: postgres:15
    restart: always
    # set shared memory limit when using docker-compose
    shm_size: 128mb
    volumes:
    - ./data/postgres:/var/lib/postgresql/data
    environment:
      POSTGRES_PASSWORD: somesecretpw
      POSTGRES_DB: litellm
      PGDATA: /var/lib/postgresql/data/pgdata

  litellm:
    image: ghcr.io/berriai/litellm:main-latest
    restart: always
    depends_on:
      - db
    ports:
       - 4000:4000
    volumes:
     - ./litellm/config.yaml:/app/config.yaml
    command: --port 4000 --config /app/config.yaml
    env_file: .env.docker
    environment:
      - DATABASE_URL=postgresql://postgres:somesecretpw@db:5432/litellm

  caddy:
    image: caddy:2.7
    restart: unless-stopped
    ports:
      - "80:80"
      - "443:443"
      - "443:443/udp"
    volumes:
      - ./caddy/Caddyfile:/etc/caddy/Caddyfile
      - ./caddy/data:/data
      - ./caddy/config:/config

  # everything below this line is optional and can be commented out
  ollama:
    image: ollama/ollama
    restart: always
    ports:
      - 11434:11434
    volumes:
      - ./ollama:/root/.ollama
    deploy:
      resources:
        reservations:
          devices:
            - driver: nvidia
              count: 1
              capabilities: [gpu]
Note that Ollama is optional in this setup and we can deploy without it. That might be helpful if you want to take advantage of being able to switch between different commercial APIs but don't want to run local models (or perhaps don't have the hardware for it). If you want to turn off Ollama, comment it out or remove it. You'll also need to remove the Ollama line
We also need some support files.
Caddyfile
The caddyfile is used to route incoming web traffic to your services. Edit the file caddy/Caddyfile. Assuming you have set up DNS as required, You can do something like this:
chat.example.com {
    reverse_proxy ui:3000
}

api.example.com {
    reverse_proxy litellm:4000
}
Secrets in .env.docker
We need to create a docker env file which contains our API keys for the services we want to use.
Here we also define a "master" API key which we can use to authenticate Open Web UI against LiteLLM and also to log in to LiteLLM and see the API call stats.
ANTHROPIC_API_KEY=sk-blah
OPENAI_API_KEY=sk-blablabla

LITELLM_MASTER_KEY=sk-somesecretvalue
LiteLLM Config
We need to create a very basic config.yaml file which LiteLLM will read to tell it which external models you want to allow users of your web ui to access.
model_list:
  - model_name: claude-3-opus ### RECEIVED MODEL NAME ###
    litellm_params: # all params accepted by litellm.completion() - https://docs.litellm.ai/docs/completion/input
      model: claude-3-opus-20240229 ### MODEL NAME sent to `litellm.completion()` ###
      api_key: "os.environ/ANTHROPIC_API_KEY" # does os.getenv("AZURE_API_KEY_EU")
  - model_name: gpt-4o
    litellm_params:
      model: openai/gpt-4o
      api_key: "os.environ/OPENAI_API_KEY"
  - model_name: groq-llama-70b
    litellm_params:
      api_base: https://api.groq.com/openai/v1
      api_key: "os.environ/GROQ_API_KEY"
      model: openai/llama3-70b-8192
In the example above we tell LiteLLM that we want to connect to Anthropic, OpenAI and Groq and we will allow access to Claude Opus, GPT-4o and Llama 70B respectively. The api_key directives tell LiteLLM to grab the values from named environment variable os.environ/ENV_VAR_NAME so we can customise our env vars to whatever makes sense.
LiteLLM uses the prefixes on model names to know which API it needs to use e.g. it sees claude and knows to use the Anthropic API client. We can also use openai/ to instruct LiteLLM to load any model that supports OpenAI-compatible endpoints out of the box.
First Run Setup
Start Docker
Ok now that we've created all the config files we can start our docker-compose cluster. You can run docker-compose up -d to bring all the services online.
Log in to LiteLLM
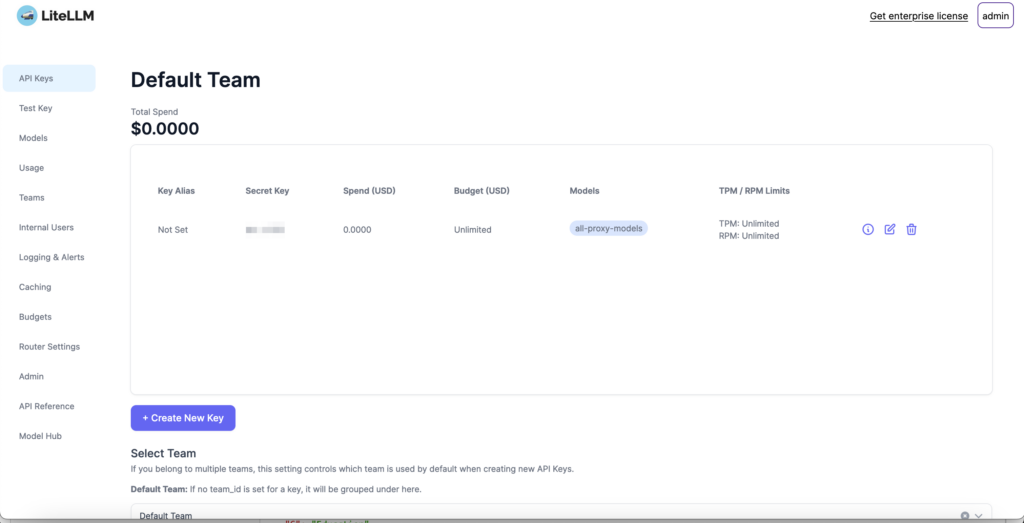
Let's start by testing that our LiteLLM setup works. You should be able to navigate to litellm via the caddy subdomain (eg.. https://api.example.com) or via http://localhost:8080/ui to get to the LiteLLM UI. If you're not running on your current machine you can also use your LAN IP address instead. You'll need to enter admin as the username and whatever value you used for LITELLM_MASTER_KEY above as the password (including sk-). If all goes well you should see a list of API keys which initially only contains your master key:
If you navigate to the "Models" tab you should also see the models that you enabled in your config.yaml and if all has gone well, pricing information should have been pulled through from the API
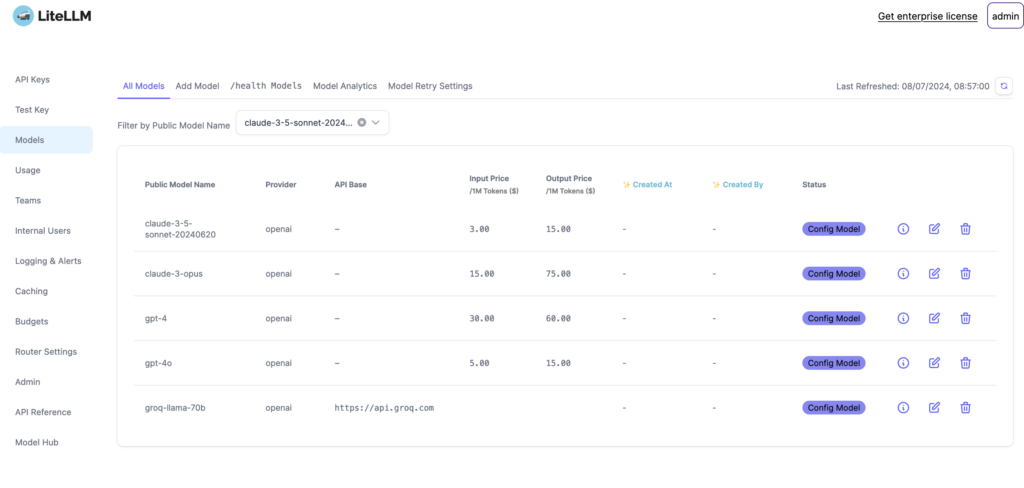
Model Name: “claude-3-5-sonnet-20240620”
- Provider: openai
- Input Price: 3.00
- Output Price: 15.00
- Status: Config Model
- Icons for editing, copying, and deleting appear next to each model.
Model Name: “claude-3-opus”
- Provider: openai
- Input Price: 15.00
- Output Price: 75.00
- Status: Config Model
- Icons for editing, copying, and deleting appear.
Model Name: “gpt-4”
- Provider: openai
- Input Price: 30.00
- Output Price: 60.00
- Status: Config Model
- Icons for editing, copying, and deleting appear.
Model Name: “gpt-4o”
- Provider: openai
- Input Price: 5.00
- Output Price: 15.00
- Status: Config Model
- Icons for editing, copying, and deleting appear.
Model Name: “groq-llama-70b”
- Provider: openai
- API Base: https://api.groq.com
- Status: Config Model
- Icons for editing, copying, and deleting.
The right corner of the page shows “Get enterprise license” and “admin” links. The last refresh date and time are displayed as 08/07/2024, 08:57:00. The left sidebar includes links for API Keys, Test Key, Models, Usage, Teams, Internal Users, Logging & Alerts, Caching, Budgets, Router Settings, Admin, API Reference, and Model Hub." class=“wp-image-3170”/>
Create Open Web UI Account
Next we need to create our Open Web UI account. Go to your chat subdomain https://chat.example.com/ or http://localhost:3000 and follow the registration wizard. Open Web UI will automatically treat the first ever user to sign up as the administrator.
Connect Open Web UI to LiteLLM
Once we're signed in we need to connect Open Web UI to LiteLLM so that it can use the models. Click on your profile picture > Admin Panel > Settings and open the Connections tab:
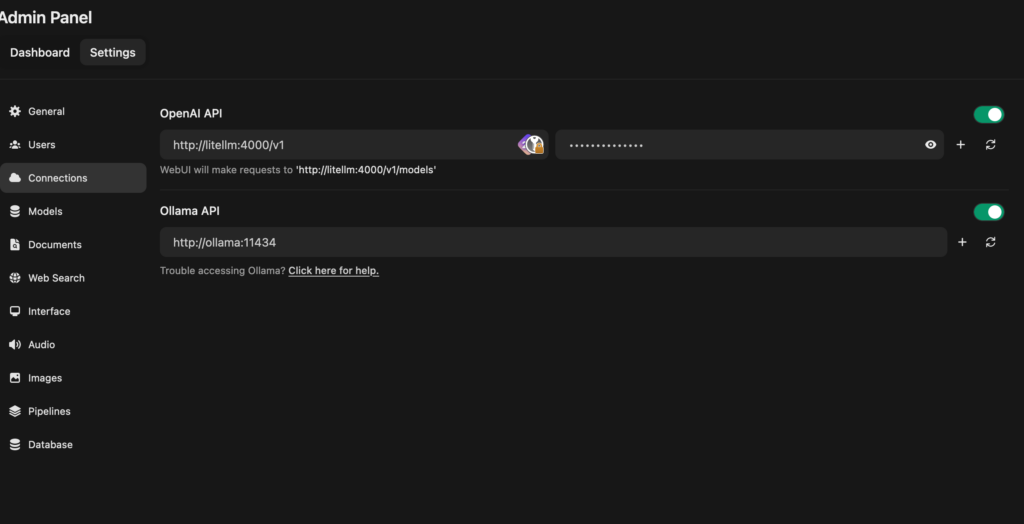 The main section displays configurations for two APIs:
-
OpenAI API
- URL: http://litellm:4000/v1
- WebUI requests to: ‘http://litellm:4000/v1/models’
- Includes a masked API key field with an eye icon to reveal the key, a plus icon to add a new key, and a refresh icon. The toggle switch for this API is turned on.
-
Ollama API
- URL: http://ollama:11434
- A clickable link for help: “Trouble accessing Ollama? Click here for help.”
- Features include a plus icon to add a new key and a refresh icon. The toggle switch for this API is also turned on." class=“wp-image-3171”/>
Since everything is running inside docker-compose we can address litellm (and Ollama if you enabled it) using their container names. In the OpenAI API box enter the path to your litellm API endpoint - should be http://litellm:4000/v1 and in the API key box enter your master password from LITELLM_MASTER_KEY. Click the button to test the connection and hopefully you'll get a green toast notification to say that it worked.
Ollama should already be hooked up if you turned it on. If you didn't enable ollama but want to now, make sure the container is started (docker-compose up -d ollama) and then enter http://ollama:11434 in the url field).
Question: If Open Web UI lets us connect multiple OpenAI endpoints, why do we need LiteLLM?
Open Web UI won't talk directly to models that don't use OpenAI compatible endpoints (e.g. Anthropic Claude or Google Gemini). LiteLLM also lets you be specific about which models you want to pass through to OWUI. For example, you can hide the more expensive ones so that you don't burn credits too quickly. Finally, LiteLLM gives you centralised usage/cost analytics which saves you opening all of your providers' API consoles and manually tallying up your totals.
Testing it Out
Congratulations if you got this far, you now have a working self-hosted chat proxy system. Time to try out some prompts - use the drop down menu at the top of the window to select the model you want to use.
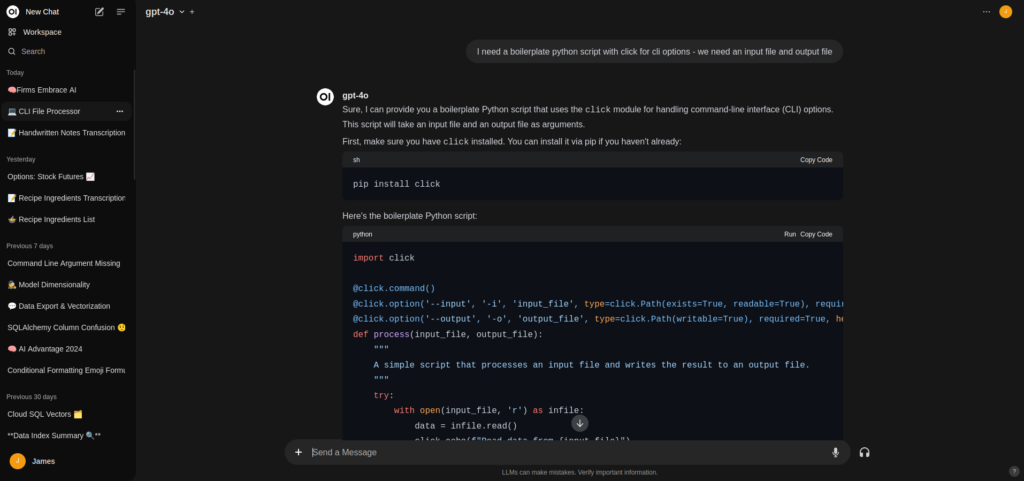
You can race/compare models using the +/- buttons in the top left to have them all read the current prompt and respond in parallel.

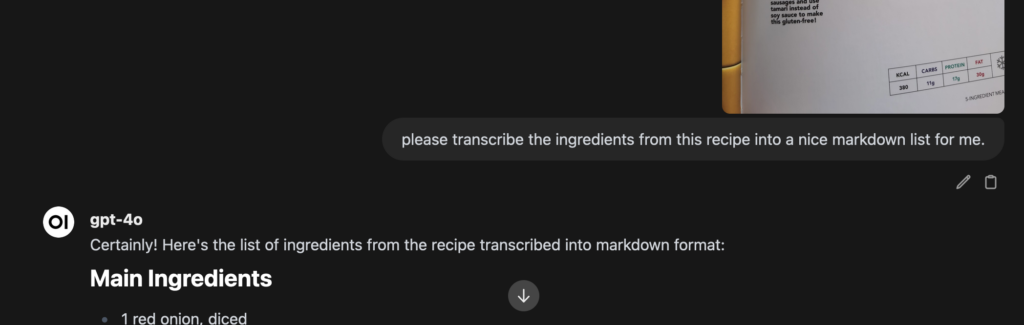
You can even use the multi-modal features of the model from this view by uploading images and documents. Open Web UI will automatically pass them through as required.
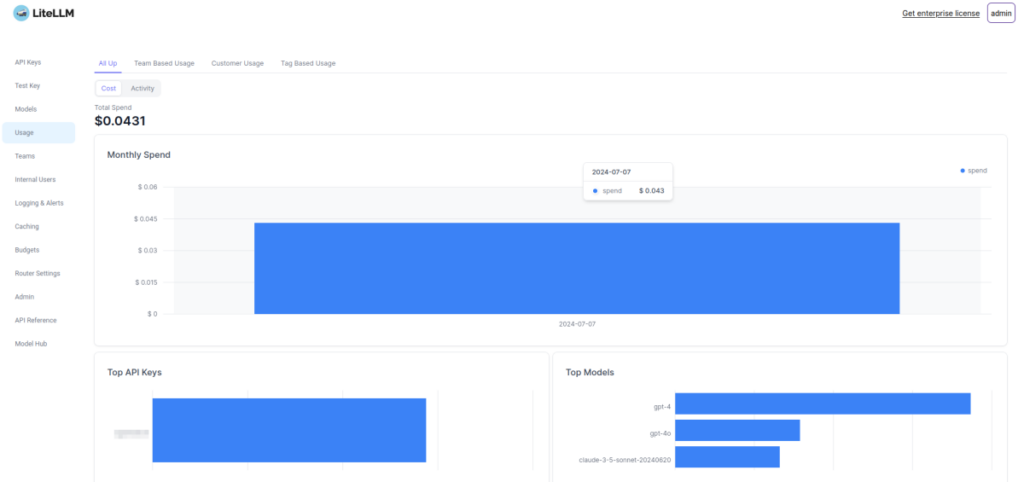
Monitoring Usage
Once we've made some API calls we can log back into litellm and go to "Usage" to see how much it's cost us.
Final Thoughts
Congratulations, now you've got a fully self-hosted AI chat interface set up. You can load up your API keys with a few $ each and track how much you are spending from LiteLLM's control panel.
If you enabled ollama, you can stick to cheap/self-hosted models by default and switch to a more powerful commercial model for specific use cases.
If you found this tutorial useful, please consider subscribing to my RSS feed, my newsletter on medium or following me on mastodon or the fediverse:
Replies & Web Activities
If you would like to comment or reply then toot me or bluesky me about this url, or send me a webmention